
Email Automation Example
Learn how to automatically send emails when events happen in your system. This is one of the most popular uses of CiraIQ!
Use Case: Form Submission Notification
Section titled “Use Case: Form Submission Notification”Scenario: You have a contact form on your website. Every time someone submits it, you want to:
- Send them a thank-you email
- Notify yourself about the new lead
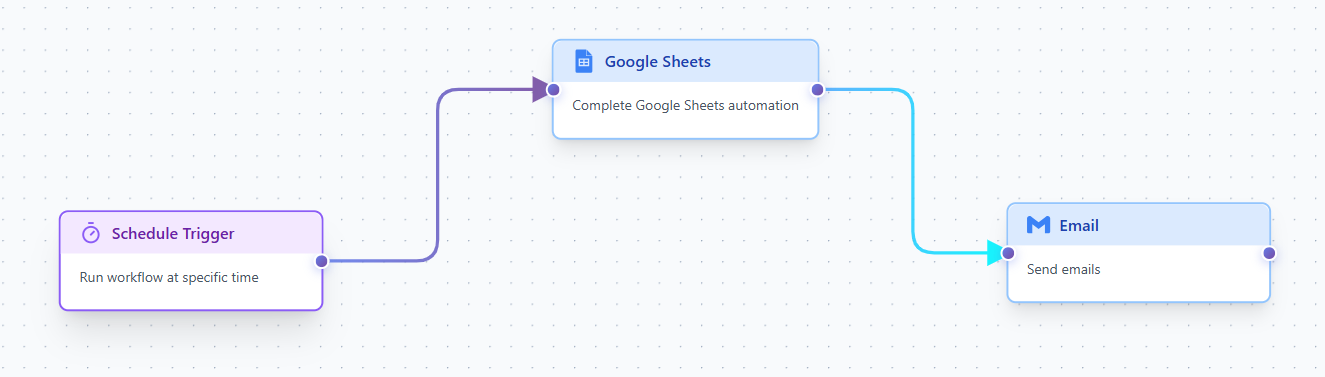 Complete Workflow - Show the full workflow in the builder
Workflow Overview
Section titled “Workflow Overview”📊 Trigger: Google Sheets
When a new row is added to your form responses sheet
📧 Action: Email to Customer
Send personalized thank-you email to the person who submitted
📧 Action: Email to You
Send notification to yourself with the submission details
Step-by-Step Setup
Section titled “Step-by-Step Setup”Step 1: Add Google Sheets Trigger
Section titled “Step 1: Add Google Sheets Trigger”- Drag a “Google Sheets Trigger” onto the canvas
- Configure it with:
- Spreadsheet ID: Your form responses spreadsheet
- Sheet Name: Usually “Form Responses 1”
- Check Interval: 60 seconds
Step 2: Add First Email Action (To Customer)
Section titled “Step 2: Add First Email Action (To Customer)”-
Drag an “Email” action onto the canvas
-
Connect it to the Google Sheets trigger
-
Configure:
-
To:
{{data.row.B}}(assuming email is in column B) -
Subject: “Thanks for contacting us!”
-
Message:
Hi {{data.row.A}},Thank you for reaching out! We received your message and will get back to you within 24 hours.Best regards,Your Team
-
- `{{data.row.A}}` = Column A (Name) - `{{data.row.B}}` = Column B (Email) - `{{data.row.C}}` = Column C (Message)
Step 3: Add Second Email Action (To You)
Section titled “Step 3: Add Second Email Action (To You)”-
Drag another “Email” action
-
Connect it to the first email action
-
Configure:
-
To:
your@email.com -
Subject: “New Contact Form Submission”
-
Message:
New form submission received!Name: {{data.row.A}}Email: {{data.row.B}}Message: {{data.row.C}}Submitted at: {{data.timestamp}}
-
Step 4: Save and Activate
Section titled “Step 4: Save and Activate”- Click “Save” to save your workflow
- Toggle the workflow to Active
- Your automation is now running!
Testing Your Workflow
Section titled “Testing Your Workflow”Before activating, test it:
- Use the “Test” button
- Manually add a row to your Google Sheet
- Wait 60 seconds (the check interval)
- Check if both emails arrived
What Happens Now?
Section titled “What Happens Now?”Every time someone submits your contact form:
- ⏱️ Within 60 seconds, CiraIQ detects the new row
- 📧 Customer receives thank-you email immediately
- 📬 You get notified about the new lead
- ✅ All automatic - no manual work required!
Customization Ideas
Section titled “Customization Ideas”Make this workflow even better:
Add Priority Routing
Section titled “Add Priority Routing”Send urgent inquiries to Slack:
[Google Sheets] → [Check if urgent?] ├─ Yes → [Slack Alert] └─ No → [Regular Email]Add Follow-Up Sequence
Section titled “Add Follow-Up Sequence”Send multiple emails over time:
[Initial Email] → [Wait 2 days] → [Follow-up Email]Add Data Validation
Section titled “Add Data Validation”Check if required fields are filled:
[Google Sheets] → [Has email?] ├─ Yes → [Send Email] └─ No → [Log Error]Troubleshooting
Section titled “Troubleshooting”Emails not sending?
- Check spam folder
- Verify email addresses are correct
- Check execution logs for errors
Google Sheets not triggering?
- Verify spreadsheet ID is correct
- Check Google account is connected
- Ensure check interval has passed
Variables not working?
- Make sure column letters match your sheet
- Check spelling:
{{data.row.A}}not{{data.A}}
Related Examples
Section titled “Related Examples”- Team Notifications - Add Slack alerts
- Scheduled Reports - Send daily summaries
- Form Processing - Advanced form handling
Ready to build this workflow? Head to your dashboard and create a new workflow!